Saturday, March 5, 2011

Symbol - The Cherokee Syllabary


My Symbol Themed Quilt - The Cherokee Syllabary

Not long after reading that "Symbol" would be the theme for one of our challenge quilts, I knew what I wanted to do. My husband, Ralph's, family is Cherokee, and because their heritage is so much a part of who they are, I wanted to honor them by making this special quilt.


Ralph's Grandfather, Enos Quinn Martin, with the Cherokee Syllabary in the background


A LITTLE HISTORY... There's GOLD in them thar hills!!!

In February of 1860, my husband Ralph's great grandfather, Jack Martin, according to the history books and family stories, is credited with starting the gold rush in the San Bernardino mountains of southern California.

In 1850, when Jack Martin and Bill Holcomb were just teenagers, they left Iowa to find their fortune in the gold fields of Oregon. After finding very little gold, and nearly starving to death, the boys left Oregon and worked their way down through northern and central California, trying their luck at various gold mining camps, until they eventually made their way to Los Angeles. While living in Los Angeles, Jack Martin met and married his wife, who was a full-blood Cherokee, and they made their home in Los Angeles.

Even after finding only scant amounts of gold in Oregon and northern California, Jack Martin and Bill Holcomb hadn't given up their dream of finding gold, and in 1859, when they heard tales of a place called Bear Valley, located in the San Bernardino Mountains of southern California, they began putting aside money and supplies, and planning their trip to Bear Valley.

The Gold Rush - Big Bear Lake and Holcomb Valley

(From a day-trip guidebook published by the San Bernardino National Park; and, from the book, Mines of the San Bernardinos, by John Robinson.)

In February of 1860, two prospectors, Bill Holcomb and Jack Martin arrived in Bear Valley during the dead of winter. They found the valley covered in snow and set up camp in an area called Starvation Flats, located where the intersection of Stanfield and Big Bear Boulevard is today.

After arriving at Starvation Flats, and with an unusually severe winter coming on, Jack Martin and Billy Holcomb had only enough time to build a tiny cabin that was less than six feet tall at the peak of the roof, and only four feet high at the walls. The cabin was later named "The Pygmy Cabin."

The Pygmy Cabin was a popular spot for tourists in Holcomb Valley, in the mountains of San Bernardino, CA. Ralph and I were able to visit the Pygmy Cabin many times from the late 1950's until the early 1980's when, sadly, it was vandalized and eventually burned to the ground.
Because of the unusually cold winter, food was in short supply for the miners at Starvation Flats, so Jack Martin volunteered to return to Los Angeles for more supplies and Bill Holcomb went hunting for food. Bill headed north across the valley and climbed up the mountain just west of Bertha Peak. From the top of the ridge he gazed upon a new lush green valley that would eventually bear his name. Bill killed two bear, packed his kill on burros and returned to Starvation Flats.

On May 5, 1860, Billy and Jack set up camp in the main gulch located between the upper and lower parts of Holcomb Valley. According to San Bernardino historian L. Burr Belden, the Bear Valley [gold] rush was triggered when prospectors Billy Holcomb and Jack Martin uncovered a gold-bearing vein on a hillside above Bear Valley, from which they averaged $5 to $10 a day apiece. Provisions ran low so Martin packed out after flour [and other supplies] and paid for his provisions with gold dust in San Bernardino. 

News of Holcomb's and Martin's find spread quickly, and by July of 1860, there were more than 1,000 miners feverishly working their gold claims. Almost overnight, a town called Belleville sprang into existence with a collection of stores, saloons, dance halls, and blacksmith shops. About the same time, two other towns, Clapboard Town and Uniontown, also appeared in Holcomb Valley. Holcomb Valley even had a brewery!


Sequoyah and the Cherokee Syllabary


Sequoyah (AKA, George Gist), 1770? - 1843, the Cherokee Indian credited with the invention of the syllabary for writing Cherokee.
In approximately 1809, Sequoyah gathered with some friends in his blacksmith shop, and the conversation led to a discussion regarding the non-Indians' method of communicating through writing. He pondered devising a way for the Cherokee to be able to do the same thing, although those around him were skeptical and thought it was some sort of witchcraft. But, Sequoyah seemed to understand that the writing stood for words.

His plans were interrupted when he volunteered to serve in the War of 1812. After he was discharged from service, he continued to study the idea of a way to write the Cherokee language. The first attempts were to make a symbol for each word in the language, but very quickly the number of symbols was becoming astronomical. This caused him to be more selective in the form of writing the language, and he began listening more intently to the individual sounds that made up the words. After long study, he realized there were 85 individual symbols which were used to make up the many words of the Cherokee language. He was then able to limit the symbols to a much smaller number than he had originally developed, and they could be used in combinations to form any word. His first student was his brother-in-law, Michael Waters, and the first to read and write with the invention was his daughter Ayoka.

Although the system was foolproof and easy to learn, Sequoyah and Ayoka were charged with witchcraft, and were brought before George Lowery, their town chief, for trial. Lowery brought in a group of warriors to judge what was termed a "sorcery trial." For evidence of the literacy claims, the warriors separated Sequoyah and his daughter to have them send messages between each other until they were finally convinced that the symbols on paper really represented talking. At the end of the trial, the warrriors asked Sequoyah to teach them. Within a week, all were able to read and write their own language. Within a few months, a large number of the Cherokee Nation had achieved literacy. This gift helped the Cherokee preserve their history, culture, and spiritual practices.

The Cherokee University in Talequah, Oklahoma has courses in which students are taught to speak and write Cherokee using the syllabary invented by Sequoyah.

"Your invention of the alphabet is worth more to your people than two bags full of gold in the hands of every Cherokee." - Sam Houston

I got a kick out of the following ad, dated May 15, 1828, which is written in both English and Cherokee, in The Cherokee Advocate newspaper.

Making the Symbol Quilt

Enos Quinn Martin (Jack Martin's son) and family in 1908.
The baby is Ralph's mother, Beulah Jane

I did a bit of cropping, and "Photo Shopping" to remove little Beulah Jane from the family photo and to re-create his shoulder on the right. I enlarged the photo to fit the 12"x12" quilt size, and printed it onto cotton ink-jet printer fabric. I ironed fusible web to the back of the fabric so it could then be fused to the quilt.


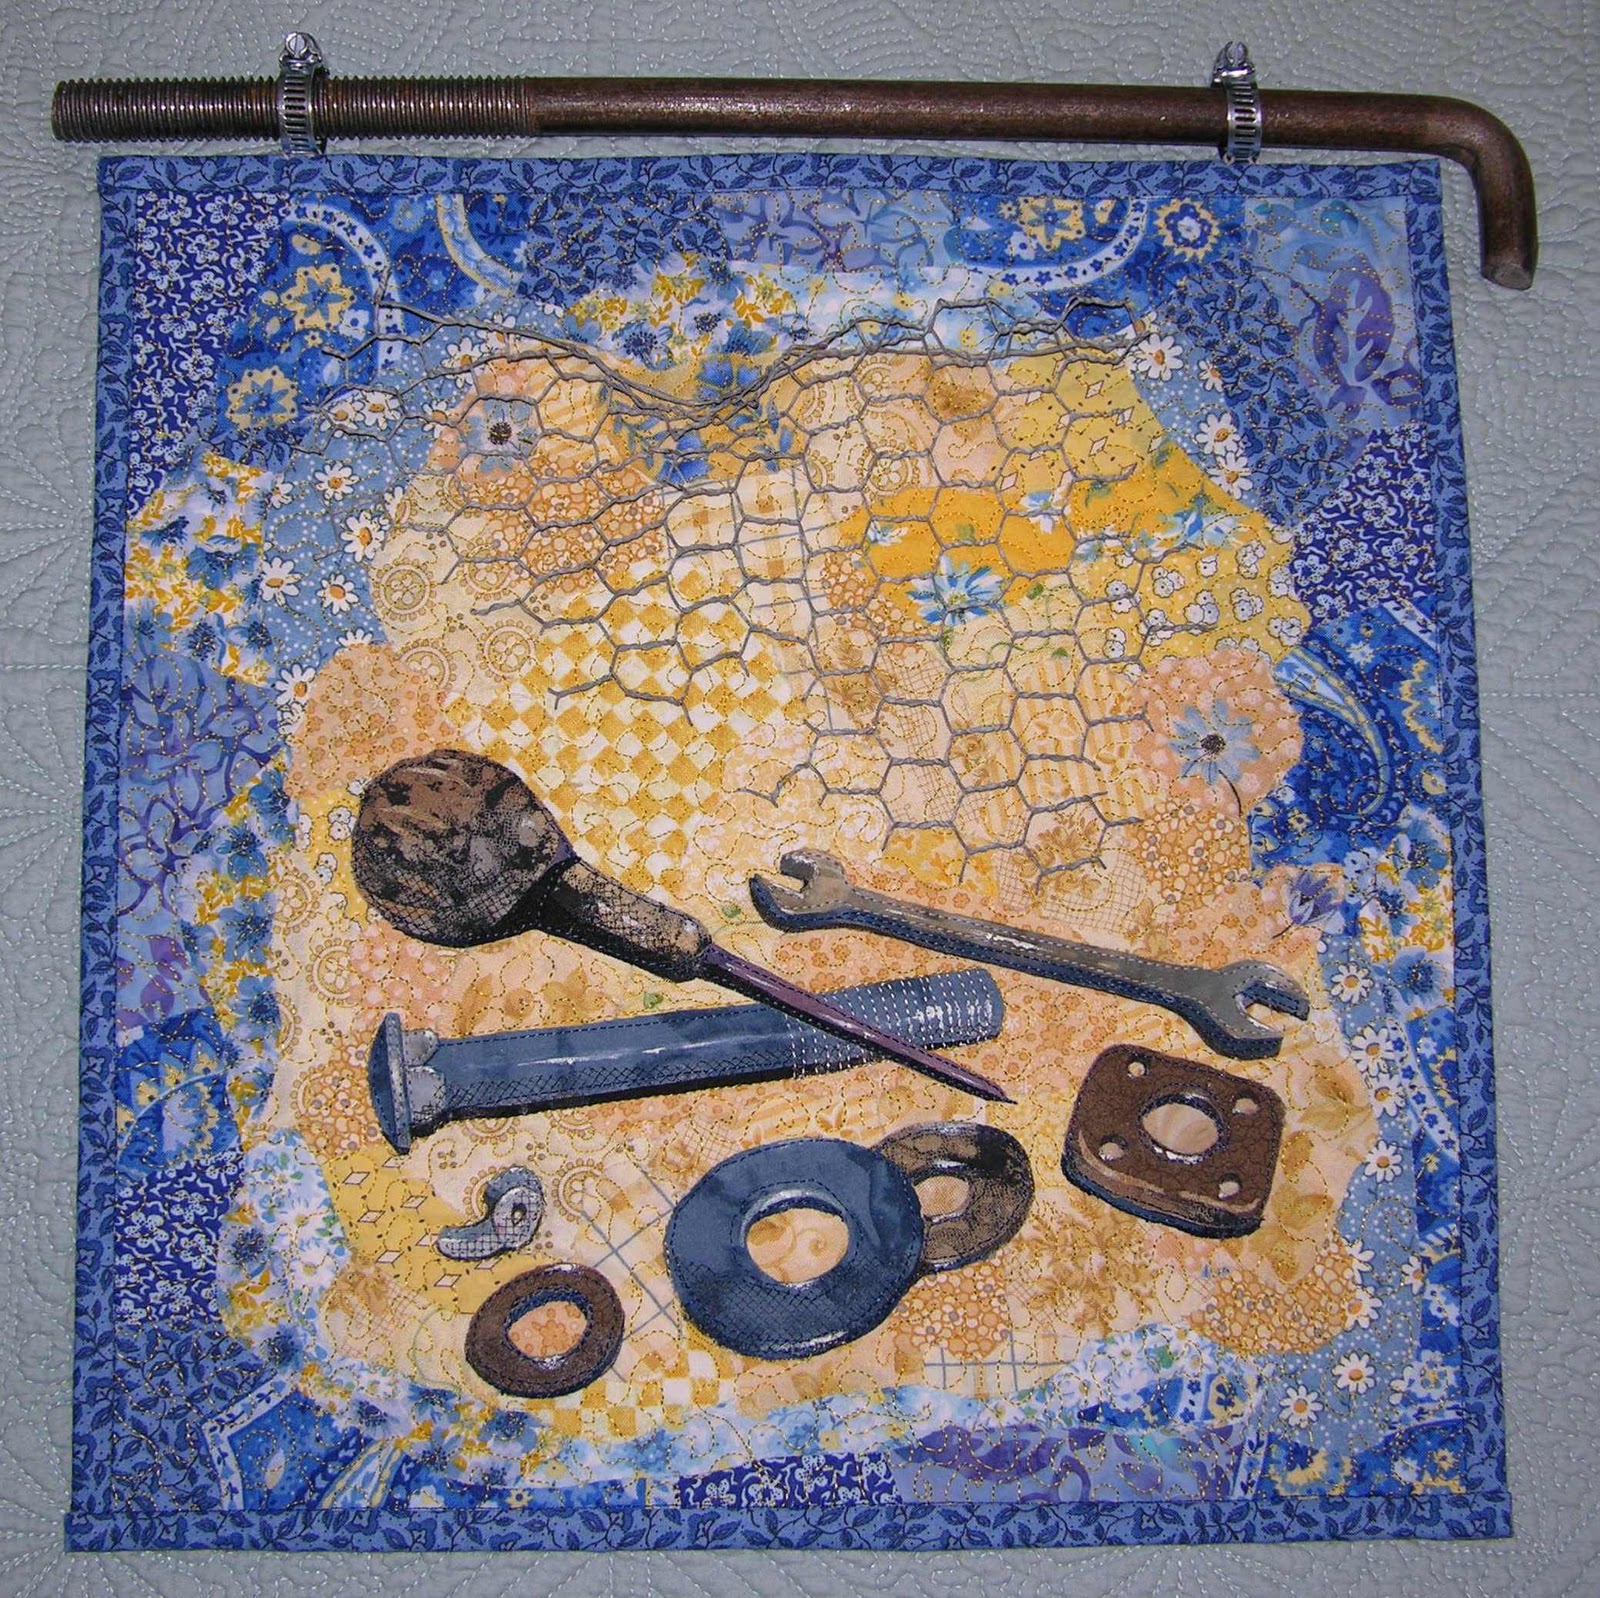
The Cherokee Syllabary was printed on silk ink-jet printer fabric. I laid the silk print into place onto a 13" square of muslin, stitched around the perimeter, and then used a "stitch and flip" crazy-quilting method for adding the remainder of the fabric patches to the quilt.


The Cherokee Seal was printed onto silk. A piece of cotton fabric was placed face down onto the silk fabric, and stitched all around just slightly outside the green band. The seam was trimmed closely, and the medallion was turned right-side out through a slit in the cotton backing fabric. After pressing, the medallion was stitched to the quilt, catching the leather thong that holds the beaded eagle feather.

Six generations of the Martin/Phillips family have lived in Los Angeles and San Bernardino counties since Jack Martin and Billy Holcomb came here in 1850. The Martin and Holcomb families went on to contribute greatly to the early days of southern California. Jack was said to have traded a piece of undeveloped land, which is on Spring Street in modern day downtown Los Angeles, for a team of mules and a wagon, so he could start a business running supplies, including borax, up into the mountains of San Bernardino. He eventually made his home in Los Angeles where he raised his family. Some of his family still reside in Los Angeles, and many more in other areas of southern California. Billy went into politics in San Bernardino County, and held elected offices there for the better part of his life. His descendants still live in San Bernardino County, and many other areas of southern California.

Hardware Themed Quilt

Well, I've finally finished my Hardware themed quilt. I get so obsessed with these little quilts, I know I have more than 40 hours into this one...

Finished Hardware Quilt

I thought of several ways I might depict this theme, the closest contender was to use a piece of metal hardware cloth (small wire squares) for the background, and then make people (and a dog and cat) with arms, legs, heads and bodies made from actual screws, bolts, wire, and my favorite - steel wool for hair... Okay, it was a cute idea, and I nearly did it!!! But, it was such an obvious "Carolyn" thing to do, so I didn't!!!

Somewhere, rattling around in the back of my mind, I kept thinking about how it might look if I used fabric to make the hardware. I could visualize it, but wasn't sure what technique I'd use to accomplish it. I figured using fusible pieces of fabric would work, but what kind of artsy background could I come up with. With all of this stuff still clunking and rattling around in my brain, as luck would have it, I received an Amazon package that contained two books that I'd ordered by artist Susan Carlson who does fabric collage using nearly confetti-sized (an admitted exaggeration here) pieces of fabric to construct her art quilts. Her first book, "Free-Style Quilts, A No-Rules Approach," and her second, "Serendipity Quilts," explain in words and in excellent photographs how she uses her technique. It sounds easy, it looks easy, but I found out that it ain't easy!!! However, after literally hours upon hours of playing with all manner of yellow scraps, I finally started getting a little more comfortable with the technique. Oh foolish one that I am, I stepped back and took a good look at the earnest beginnings of my new-found expression in art, and realized that it really wasn't all that easy to blend the fabrics so they looked cohesive, but were still interesting... Fortunately, because her technique uses just tiny spots of Aleene's Tacky Glue to hold the pieces in place, it's pretty easy to rip them off when you need to - unfortunately, I had to do a lot of that!!!

STEP-BY-STEP

Photo Set-Up 


Photo of Photo...


I laid muslin over top of the photo and traced the design.


I made multiple copies of the pattern so I could cut out the individual pieces and use them as a pattern to cut them out of fabric. I used fusible web on the backs of all of the tools and hardware, and then cut them out and either pinned them in place or used the tip of a hot iron to tack them down in a couple of places.


I added a variety of yellow background pieces around the tools and hardware using small amounts of tacky glue to hold them in place. The edges of all fabric pieces, including the tools and hardware, are left un-glued so subsequent pieces of fabric can be slipped around and underneath the edges as needed. Some shading and highlighting fabrics have been added to make the objects appear more three-dimensional. I'm beginning to add the blue border.

Blue border is almost finished. This was the most difficult part for me to get right as I didn't want to go from the softer yellow straight into the intense blues. So I used lighter shades first, then the darker blues, with the intense indigo blues all the way to the outer edges. After being semi satisfied with the merge from yellow to blue, I found myself really enjoying working with all of the blues, especially the deep indigo blues.


The finished quilt, before adding the poultry netting (twisted metal chicken wire) to the top area. Small touches of white paint have been added for highlights on tools and hardware. Note that black netting fabric was used to add more shading to the lower areas of the tools and hardware pieces.


Hose clamps were used as loops to hang the quilt.


A large bolt was slid through the hose-clamp loops.

Although there was a real learning-curve with Susan Carlson's time-consuming fabric collage technique, I have to admit that I enjoyed every minute of it, and will definitely be using it again!

Thursday, February 24, 2011

A Crazy-Quilter's Journey into Art Quilting

The Baker's Dozen, http://we-are-the-bakers-dozen.blogspot.com/, was formed by Thearica  Burroughs in the Spring of 2010, bringing together thirteen women with a common interest in learning to create Art Quilts.

Thearica's introduction:

Our group consists of 13 quilters located in various states across the U.S.A.! We represent VA, NC, OK, PA, CA, NE, NY, MA, IL, MS, and WA! We became friends through a quilting forum and now share this common interest of creating quilted art together via our blog! Every 6 weeks we each will create a piece of quilted art according to a theme chosen by one of the group members. At the end of our journey, we will have created 169 pieces of quilted art together! So come along on our journey!.....we are sure to delight you time and time again!

Thearica - Freedom
Colleen - Baubles, Bangles, and Beads
Kathi - Hardware Store
Penny- Totem
Nicki - Ocean
Karen F. - Self Portrait In Song
Lois- Celestial Objects
Jody - Cottage
Shirley - Home
Jackie - Butterflies
Charlyn - Time
Carolyn - Tempest
Karen H -

Friday, September 3, 2010

Singingwoods Giveaway

Helen Simon's Lampwork Rose Bead

I've just found the most wonderful blog that's chock-full of beautiful jewelry, gorgeous lampwork beads, charms, and some of the most adorable fairies you've ever seen!!! Janet has put together a really fun blog that you don't want to miss!

Visit Janet at her Singingwoods Blog to enter to win Helen Simon's gorgeous lampwork rose bead, shown above, and an assortment of beautiful charms and beads. Hurry, time's running out to enter to win this amazingly generous giveaway!!!

http://janet-singingwoods.blogspot.com/

Monday, March 1, 2010

CQMagOnline Article: Painted Backgrounds

The dragonfly below is from the Painted Backgrounds article in the October 2009 issue of CQMagOnline, featuring painted or dyed backgrounds for use in crazy quilting, or other applications. http://www.cqmagonline.com/vol08iss04/articles/962/index.shtml

The dragonfly and the background are painted on Dupioni silk.

The article includes techniques for dying silk ribbon, lace, embroidery threads, fabrics, etc., without getting undesirable muddy or brown areas.

This Dupioni silk "background" was dyed with OzeCraft fabric dyes.
Dupioni silk fabric, and silk ribbon, dyed with OzeCraft fabric dyes.

Monday, February 15, 2010

Mermaid for Kathy

Kathy's Mermaid
My part of our "Mermaid's Tale Round Robin"


Mermaid's Treasure Chest from our "Mermaid's Tale Round Robin"

Thursday, December 3, 2009

December's Free Silky

Purple and Yellow Pansy in Watercolor
This little pansy silky was painted in a much looser, more casual watercolor-style...
Sometimes it's fun to just play around and not take things too seriously.
Let me know what you think??

Friday, November 27, 2009

CHRISTMAS CRACKERS

CQI Christmas Crackers - 2009
This is the first year I've participated in the annual CQI Christmas Cracker Swap, and I had a wonderful time making the CQ pieced block covers for each cracker, and then gathering a whole bunch of beautiful fabrics and embellishments to roll up inside each one!!!
Finished Cracker #1

CQ Pieced Block Cover for
Cracker #1

Finished Cracker #2

CQ Pieced Block Cover for
Cracker #2

Finished Cracker #3

CQ Pieced Block Cover for
Cracker #3

Tuesday, November 24, 2009

BEADED DRAGONFLY TUTORIAL

All beads are iridescent glass, except
the oval-shaped beads used for the tail.

Head: 1 - round 6mm clear glass bead
Body: 1 - round 6mm Cloisonne' bead
Wings: 4 - 13mm dagger beads
Tail: 6 - 5mm oval beads
Beading thread that will blend into background
Beading needle, (or fine #11 or #12 short quilting needle)

Directions and illustration shown below.


The dragonfly is designed to be sewn directly in place onto fabric.

The dragonfly's body is attached first, using the Cloisonne bead, and positioning the bead opening to run horizontally. Attach the body firmly to the fabric using two or three passes through the hole and the fabric. Pass the needle and thread through the body and then thread the needle through the holes in the narrow tip of two of the dagger beads, and then pass the needle back through the Cloisonne bead, exiting on the other side of the body. Thread through the two remaining wings, and then back through the body. Do this a couple of times, being sure that the body and wings are strung together tightly enough to keep them in place, but not so tight that you bread the bead. Refer to the photo and the illustration. If they seem to be a little wobbly, take a couple of stitches up through the fabric where the set of wings attach to the body and down over the thread that holds the two wings together. Repeat for the second set of wings. Do this until each side feels tightly attached.

Attach the clear glass bead for the head. The holes in the bead should run horizontally, and should be sewn in place just as you did the body. Be sure to snug the head tightly against the body while you sew it in place. Pick up one of the tiny glass beads for the eyes, and then run the thread back through the head, and then repeat for the second eye. Take the thread down to the fabric by running the needle down through the space in between one of the eye beads and the head. This helps to hide the thread a little better.

The tail is attached by bringing the thread up snugly against the body, and then through one of the oval beads. Go back down through the fabric and back up at the beginning of the first bead, and then run the thread back through the first bead again. Thread on the second bead, then go back down through the fabric, back to the beginning of the second bead and back through the second bead, and then on through the third bead. Repeat until all six beads are in place.

Hope you enjoy making them!!!


Saturday, November 14, 2009

A Couple More Color Wheels

I've found two more color wheels that I like, mostly because of their simplicity!

Both of these color wheels illustrate Primary, Secondary, and Tertiary colors.
Tertiary (tur-she-airy) means "third," or "third level." More about this when we start our lessons.


Red, Yellow, Blue
Primary, Secondary, Tertiary
Color Wheel


Red, Yellow, Blue
Primary, Secondary, Tertiary
Color Wheel


Please see the main post about supplies -
Color Wheels below.