Thursday, December 3, 2009

December's Free Silky

Purple and Yellow Pansy in Watercolor
This little pansy silky was painted in a much looser, more casual watercolor-style...
Sometimes it's fun to just play around and not take things too seriously.
Let me know what you think??

Friday, November 27, 2009

CHRISTMAS CRACKERS

CQI Christmas Crackers - 2009
This is the first year I've participated in the annual CQI Christmas Cracker Swap, and I had a wonderful time making the CQ pieced block covers for each cracker, and then gathering a whole bunch of beautiful fabrics and embellishments to roll up inside each one!!!
Finished Cracker #1

CQ Pieced Block Cover for
Cracker #1

Finished Cracker #2

CQ Pieced Block Cover for
Cracker #2

Finished Cracker #3

CQ Pieced Block Cover for
Cracker #3

Tuesday, November 24, 2009

BEADED DRAGONFLY TUTORIAL

All beads are iridescent glass, except
the oval-shaped beads used for the tail.

Head: 1 - round 6mm clear glass bead
Body: 1 - round 6mm Cloisonne' bead
Wings: 4 - 13mm dagger beads
Tail: 6 - 5mm oval beads
Beading thread that will blend into background
Beading needle, (or fine #11 or #12 short quilting needle)

Directions and illustration shown below.


The dragonfly is designed to be sewn directly in place onto fabric.

The dragonfly's body is attached first, using the Cloisonne bead, and positioning the bead opening to run horizontally. Attach the body firmly to the fabric using two or three passes through the hole and the fabric. Pass the needle and thread through the body and then thread the needle through the holes in the narrow tip of two of the dagger beads, and then pass the needle back through the Cloisonne bead, exiting on the other side of the body. Thread through the two remaining wings, and then back through the body. Do this a couple of times, being sure that the body and wings are strung together tightly enough to keep them in place, but not so tight that you bread the bead. Refer to the photo and the illustration. If they seem to be a little wobbly, take a couple of stitches up through the fabric where the set of wings attach to the body and down over the thread that holds the two wings together. Repeat for the second set of wings. Do this until each side feels tightly attached.

Attach the clear glass bead for the head. The holes in the bead should run horizontally, and should be sewn in place just as you did the body. Be sure to snug the head tightly against the body while you sew it in place. Pick up one of the tiny glass beads for the eyes, and then run the thread back through the head, and then repeat for the second eye. Take the thread down to the fabric by running the needle down through the space in between one of the eye beads and the head. This helps to hide the thread a little better.

The tail is attached by bringing the thread up snugly against the body, and then through one of the oval beads. Go back down through the fabric and back up at the beginning of the first bead, and then run the thread back through the first bead again. Thread on the second bead, then go back down through the fabric, back to the beginning of the second bead and back through the second bead, and then on through the third bead. Repeat until all six beads are in place.

Hope you enjoy making them!!!


Saturday, November 14, 2009

A Couple More Color Wheels

I've found two more color wheels that I like, mostly because of their simplicity!

Both of these color wheels illustrate Primary, Secondary, and Tertiary colors.
Tertiary (tur-she-airy) means "third," or "third level." More about this when we start our lessons.


Red, Yellow, Blue
Primary, Secondary, Tertiary
Color Wheel


Red, Yellow, Blue
Primary, Secondary, Tertiary
Color Wheel


Please see the main post about supplies -
Color Wheels below.

Thursday, November 12, 2009

OCTOBER'S FREE SILKY

October's Free Silky is the Lavender & Yellow Pansy
Every spring my sweet husband, with a twinkle in his eye and a dopey grin on his face, comes home with "something special" hidden behind his back. As if, after 47 years of marriage, I can't smell the rich soil mingled with the light scent of pansies. My favorites are the ones that refuse to blush at their outrageous deep burgundy, and regal gold finery!
But, it wouldn't be spring without the daintily dressed pink and peach, yellow and lavender, and light blue and periwinkle pansies. Their soft colors might not be as vibrant as their showy cousins, but their appeal can't be denied. Who can resist their soft velvety texture and impish faces? Children say that the places where pansies grow are the most wonderful secret hiding places for tiny fairies and other magical creatures. If your heart is pure, you may see them, too.

Wednesday, November 11, 2009

CQ A to Z Color-Study Lesson

Supplies - Color Wheel

Because a color wheel will be a large part of our color lessons, I’ve been doing a lot of searching in the hopes of finding one that will fit all of our needs. Well……I’ve discovered that none are perfect, but there are some that will work pretty well.

The first is an “Interior Design Color Wheel,” which I like because of its fairly open design (not as much cardboard between you and the colors), and because the colors shown are more appealing and realistic than most. I also like the information that is included on the back side of the wheel, as it gives helpful information about making painting and fabric color choices in your home. And, crazy quilts are certainly something we like to live with!


“Interior Design Color Wheel” 8.5” x 11”
Available from The Color Wheel Company, $9 (which includes shipping in USA.) Contact them for international shipping. (See tiny below.) I think this will be the most useful for our color lesson; however, please do not feel that you HAVE to have it, we can do nicely with the small color wheel available from your local craft store. Also, the printable color wheel at the bottom of the page will work very well for our purposes. http://tinyurl.com/yfzbsoj


The second color wheel is about 5” across, and can be purchased at your local JoAnn Fabrics, Michaels, Hobby Lobby, and most other craft stores. It is a good, compact version of the most popular color wheels, and can be used for our color lessons. (You can always get the Interior Design Color Wheel later.)

This color wheel can be ordered in Spanish, French, and Portuguese from The Color Wheel Co. It is $4.50, which includes shipping in the USA. Contact them for international shipping. http://tinyurl.com/yjfgde6


The following is a great color tool/toy from quilt teacher and author Joen Wolfrom!!

3-in-1 Color Tool by C&T Publishing (optional, but handy)
This is a great tool for those interested in having lots of pretty color choices, along with a little more specific info. The tool is approximately 2.5”x 8”, and includes a set of 24 color cards, a set of two value (lightness or darkness) finders (one red and one green), color schemes are shown on the back of each card, and it comes with an 8” ruler.
Available from http://www.dharmatrading.com/ for $16.45 ($3.90 shipping in USA) Contact them for international shipping. Dharma has 27 of these in stock as of 11/11/09.


PRINTABLE COLOR WHEEL

No matter what color wheel you decide to get, please print this one for our lesson. You can slide it into one of the clear/transparent 3-hole plastic sheet protectors, and it can be kept in a 3-ring binder, if desired.

Okay, the next you hear from me, we’ll be starting our color lessons!!!

Carolyn Phillips
CarolynLPhillips@msn.com


Thursday, November 5, 2009

November's Free Silky - Morning Glory

In June of 1965, on a gloriously warm southern California day, I stood in the back yard of our newly-purchased first home holding my two week old son in my arms while admiring the exceptionally beautiful periwinkle-blue morning glory flowers on the vines that were growing along the short wire fence that divided our property from the elderly Mrs. Thorson's. As a new homeowner, I found everything in our realm nothing short of miraculous, and the little morning glory that I had tended and coaxed along the wire fence was no exception.

Mrs. Thorson, a no-nonsense, hard working New Englander, was an exceptionally tall and lanky woman, all elbows, knees and determination as she worked at pulling weeds on her large property. With a defiant expression on her face, she easily yanked the clumps of weeds from the hard summer soil. There was no doubt that she came from hearty stock as she tirelessly worked her way along the fence. When she finally straightened from her work and wiped the sweat from her brow, her face broke into a wide smile as she saw the baby I held in my arms. As she leaned in to get a closer look, her arm came over the fence, her large hand wrapped fully around the morning glory vine, and with one swift pull, the roots easily lost their hold in the soil and the whole thing traveled through the air to join the other weeds in the steadily growing mound! "I hate those weeds, don't you?" Those were her final words as she strode away......

"Yes," I said, as I closed my gaping mouth, "I do too......"

MORNING GLORY EPILOGUE: Do you remember years ago when Reader's Digest had a long-running section entitled something like: "My Favorite (or my Most Amazing) Character?" Mrs. Thorson was my favorite character.

I still smile over that whole incident; it just tickled me so much that this practical, hard-working, no-nonsense woman thought she was helping a young mother to keep her yard "weed"-free. It would never have occurred to her that she wasn't helping. When my husband came home from work that night, I told him what she had done, and we both had a good laugh! She was eternally "helpful." I knew, even back then, that she was a good woman with a serious veneer. She didn't go around with a smile on her face, but when she did smile, it was like the sun had risen.

She helped me raise my children, and was always coming over to "give me a break." She would head for the kitchen to do my dishes, or go get the vacuum and start cleaning, or sometimes she'd just push me out the door while she stayed and watched the kids.

You can always find another morning glory, but you could never replace Mrs. Thorson.

Carolyn

Friday, October 16, 2009

CQI Fairy II Round Robin Naked Blocks

Here are my Fairy II naked blocks.

All Six 6" Naked Blocks

Ash Tree Fairy


Plane Tree Fairy


Silver Birch Fairy


Acorn Fairy


Alder Fairy


Sycamore Fairy

As soon as we have folders assigned, I'll post them on the CQI site.

Thursday, October 15, 2009

October Silky - Lily says she IS a flower, after all...


Although the October Silky has finally been posted (above), my little Bichon, Lily, has decided to hang out and keep us company for a while longer....

Wednesday, October 7, 2009

Ellen's Finished FFT #9 Block

YAY!!!! Ellen's block is finished!!! She'll be the first in our FFT #9 Round Robin to have her block come home... Ellen, I hope you like the work we've done on your block!!!!

Thearica was the first to work on Ellen's block, and she made the wonderful, whimsical beaded bluebird in the upper left corner, as well as the bright yellow daisy and leaves, the metal branch with the tiny birds and nest, angel charm in the center, scattered daisies, and the tiny mother-of-pearl birds everywhere. I love everything you did Thearica!

Click on the picture to see a close up view.


Next, Nicki made the beautiful garden that's growing across the bottom of the block, using her gorgeous hand-dyed lace flowers and leaves. She used French knots to create stalks of snapdragons, and then embellished it all with beads, sequins and charms. Buzzing and floating amongst the beautiful flowers are bees and dragonflies. Just gorgeous, Nicki! Click on picture for close up.


Next, Darlene added a beautiful fabric-transfer angel, (below), and then gave her a set of beautiful golden wings. There are pretty silk-ribbon flowers and a tiny butterfly to keep the little angel company. The frame is made from a delicate yellow braid and tiny pearl beads. In addition to embellishing several seams, Darlene also machine embroidered the little white bird sitting in the nest, just below the angel. Beautiful work Darlene!!! Click on the picture to see a close up view.

And, finally, it was my turn to play! I began by embellishing a couple of seams, and then moved on to make a beaded dragonfly in the upper right corner. Love those dragonflies!!!!! I've had some really nubby, lumpy Edmar boucle thread that I hadn't a clue what to do with, until I decided to use it for a nest and a branch to hold Darlene's adorable little bird. I was pretty happy with my first adventure in "boucle'ing!" (Happy I didn't mess it up!)
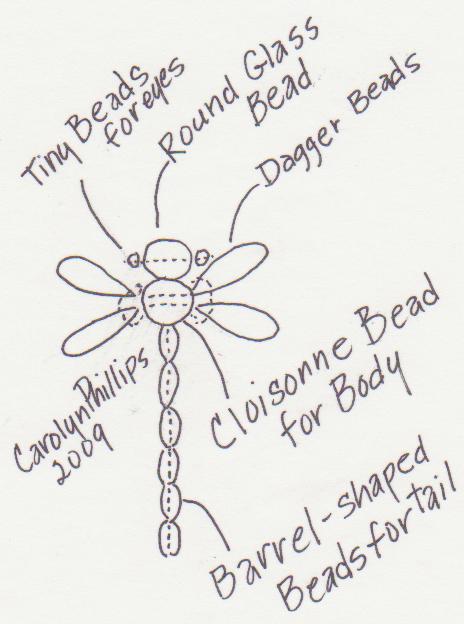
Everytime I looked at the dark blue patch that's next to Nicki's flower garden, I couldn't keep from thinking of a pond!!! So, I went for it!!! I used my Sulky variegated metallic thread and created the surface of the "water." I added underwater plants, stocked the pond with fishies (blowing bubbles), and a tiny dragonfly skimming along the surface. I then went back and created more "water" over the fish and plants etc. Then, just for fun, I added transparent sequins and beads here and there. The fish pond is my favorite thing that I did!
And, for even more fun, I sprinkled tiny, tiny little bees everywhere!!!! Love those bees!!!

Ellen, we all had a wonderful time working on your block!!!

Saturday, September 19, 2009

My Finished Work on Thearica's Block

Thearica's beautiful block in our CQI FFT #9 round robin is rapidly making the rounds, and is nearly ready to find it's way back home. I've finished my work on the block and am ready to send it on to Ellen, who will be the the last to work on it before it heads back home to Thearica.

Nicki was the first to work on Thearica's block, and she started by adding one of her delicately beautiful hand-dyed pieces of lace in the upper right corner, which she then embellished with silk-ribbon embroidered flowers and beadwork. She then added a beautiful band of silk-ribbon roses, silk-ribbon leaves and embroidered trim - see the photo below. The little butterfly in the upper right corner is also Nicki's work.

Darlene was the second to work on the block, and her addition of the lovely white lace basket (which she made on her embroidery machine), filled with silk-ribbon flowers and leaves added to the block's elegance. She then added the adorable lace-framed kitten applique, as well as a great tag-sale find of a pin with a really cute kitten playing with a ball of yarn, adding the perfect touch of whimsy!! Darlene cleverly wrapped yarn around the existing metal ball before attaching the pin to the block. Darlene also embellished several seams on the block.
With each round of embellishing, Thearica's block is taking on it's own glitzy, glittery, girly personality!!!


Nicki added the really beautiful band of silk-ribbon roses and leaves, and then further embellished with pearls and buttonhole-stitch embroidered lavender trim. The ruched purple ribbon at the top center of the block is also Nicki's beautiful work.
The lavender-colored flower in the corner of the above picture is my work.


Using one strand of DMC thread, I made the tiny bees with four French knots (three wraps each), one black knot at each end, and two yellow knots in the middle. The wings are two metallic thread lazy daisy stitches on each side that are placed in between the two yellow knots. The dotted "speed lines" are tiny back stitches done with one strand of black DMC thread.
My favorite metallic thread is "SULKY Metallic 142 7026." It is soft, flexible, very easy to hand sew, and has a beautiful metallic sparkle. This particular spool is a variegated silver, blue, pink mix that goes with any background color. Just beautiful stuff!!!
NOTE: To give a bit of sparkle, you can substitute beads for the French knots. The remaining instructions are the same.


The web is made with metallic thread (see note above regarding SULKY metallic thread), and the spider is made with two drop beads, a small black bead for the head, and a larger iridescent blue-green bead for the body. The legs are made with glossy black beading thread.
I was the third to work on the block, and my additions were the fan in the lower right corner, the beaded dragonfly and the flowers just above the fan, the spider and spider web, the lavender colored flower in the upper left corner, the tiny bees in the lower left corner, and the cretan-stitch embellished seam across the top of the center patch. I also added beads, sequins and fluff in several places.
Hope you enjoyed seeing our work!

Friday, September 4, 2009

September's Free Silky - Strawberry & Ladybug


Two of my favorite painting subjects, strawberries and ladybugs, teamed up for September's free silky! I hope you will enjoy using it in one of your CQ blocks, paper or fiber creations.
Remember, as always, you may copy and print the image for your own use, including for swaps and round robins, but not for mass use or publication.
Enjoy!!!

Sunday, August 30, 2009

Pat Winter's Bird's Nest

WOW!!!
I won one of Pat Winters' exquisite little bird's nests from her blog drawing!!!!!!!! It's only about 1/2" across; what a tiny treasure!
See the picture below.

Thursday, August 20, 2009

Pat Winter's Bird Nests

If you love crazy quilting, fiber arts, collage, or simply love tiny treasures of all sorts, you'll love seeing the enchanting robin's nest that Pat Winter has created. If you'd like a chance to win this little charmer, visit Pat's blog. http://gatherings100.blogspot.com/

Pat Winter's Robin's Nest


Thursday, August 6, 2009

Finished My Work on Darlene's CQ Block

Darlene, your block is ready to go on to Ellen...


I finished my work on Darlene's CQ Block


Layered Seam Close Up


Close Up of Forget-Me-Not Flowers

Center Area of Block


Saturday, August 1, 2009

August's Free Silky - Mama Hummer

This beautiful little hummingbird decided to build her tiny nest just above our fish pond which, of course, gives her access to all sorts of flitting and flying critters as well as nectar from nearby flowers to keep herself and her babies well fed. She also has a well-stocked feeder whenever she wants a quick snack.

Her nest is about the size of half of a walnut shell, and her two eggs are about the size of pinto beans. It's so amazing to be able to follow the progress of this tiny creature!

AUGUST SILKY - Mama Hummer

Monday, July 20, 2009

July "Wings" Challenge

Following are three dragonflies I've posted in July's CQI "Wings" Challenge album.


Dragonfly Silky Painted for Kathi's HGTV CQ RR Valance
Painted with Jo Sonja's Acrylic Gouache


Beaded Dragonfly made for Tami's HGTV CQ RR Victorian block
The wings are made with clear iridescent dagger beads, the body is a cloisonne bead, and the tail is made from 6 iridescent oval beads.


Dragonfly made for Darlene's FFT #9 CQ block.
This dragonly is made from the same materials as the one above, except the wings are iridescent turquoise dagger beads. The head is a clear iridescent glass bead and the eyes are tiny iridescent Delica beads.


Sunday, July 19, 2009

CQI FFT #9

Darlene's first peek of my work on her block.


Close up of the dragonfly on Darlene's FFT #9 block.


Monday, July 13, 2009

HGTV CQ RR

MY MERMAID CQ

I've been wanting to make an "under the sea" themed crazy quilt for a long time, and this CQ RR gave me the opportunity. It has been wonderful to have my friends in the HGTV "Luv2Mbelish" group work on my Mermaid CQ. They have done a fantastic job of dressing up and beautifying my CQ !!! One of the most unbelievable things is that for some of the girls, this is their first CQ! I am so proud of all of them!!!


My Naked Block, (with naked mermaids!)

My Finished Block

Upper Left Block


Upper Right Block


Lower Left Block


Lower Right Block
Didn't the girls do a great job in making my block so beautiful?

Saturday, July 11, 2009

SILK RIBBON PANSY TUTORIAL

SILK RIBBON PANSY

This is the little pansy I came up with after some of the HGTV crazy quilting girls asked for a “real looking” silk ribbon pansy. I sat down with needle, thread, 13mm (about ½” wide) silk ribbon, pencil and gridded paper (which I can't seem to live without...), and the result is this fairly simple little pansy.

The three front petals will require about 7” of ribbon (mine is yellow), and the two back petals (purple) will need about 5”.

Illustration #1

Illustration #2


THE TWO BACK (purple) PETALS:
When looking at the above patterns, note that both of the back petals are made from one piece of ribbon, and are separated by the deep upside down “V” at the center of the length of ribbon. Notice, also, that the stitching/gathering line, shown on the pattern with a broken line, is done with one continuous length of thread, so you can gather it.

Using a pencil or a disappearing ink pen, draw a small 3/8” circle where you want your pansy to be. Draw a horizontal line through the center of the circle. Mark a dot in the center of the circle.

Using a very fine needle and thread that matches the silk, make the tiniest gathering stitches you can make, and run the continuous stitch as shown on the pattern, and described above. Draw the gathers up until the gathered edge of the ribbon will fit around the small half-circle that you have drawn. The gathered edge of the ribbon will be toward the center of the half-circle. Use several small stitches to attach the end of the gathered ribbon at the point where the half-circle and the horizontal line meet. Distribute the gathers evenly, being sure that the “V” shape is at the center top of the half-circle. Carefully pull the two center petals apart a little so the “V” between the two petals are a little more obvious. When you are satisfied with the arrangement of the petals, use the threaded needle to very carefully stab stitch the gathers in place all around the line of the upper half-circle. Again, take the time to be sure the gathers are evenly distributed before you tack them in place. The angled tips of the ribbons can be shortened to reduce bulk, and can then be tucked under and tacked in place.

Illustration #3


Illustration #4

THE THREE FRONT (yellow) PETALS:
Before beginning the yellow set of petals, notice that the three ribbon segments are not the same size. The larger segment will be the large yellow front petal. The two smaller yellow segments will be placed directly in front of, and sightly below the set of purple petals. (Please see Illus. #5 below.) The two yellow petals are the same size and shape as the set of purple petals. Begin your gathering stitches at the end of the yellow ribbon that has the two small segments, then continue your stitches until you've finished with the larger segment. This time you will pull the gathers up only on the segment that has the two small yellow petals, and working in a clockwise direction, fit the petals in place around the center dot in the circle. Using the center dot instead of the outer ring of the circle will automatically drop this second set of petals down below the original purple set. Distribute the gathers evenly; making sure that the “V” between the two yellow petals are aligned with the two purple petals. When you are satisfied with the arrangement of the petals, use a second needle and matching thread to tack the gathers in place. Take several tiny stitches to hold the two upper petals in place, but don't cut the thread. Using the original needle and gathering thread, tightly gather up the remaining large front petal, fold under the angled tip and then take the needle to the center dot and tack it in place. This will make large yellow petal lie in front of the smaller petals. Arrange the gathers as evenly as possible, and tack them in place. Turn under and tack down any of the angled tips that might be showing. If the tips are a little too bulky, you can trim them a little before tacking them in place.

Illustration #5


Illustration #6

You may need to tack the petals down in a couple of places, but do this sparingly, as the stitches can easily distort, and pull the petals out of shape. Often, just doing a little finger pressing will keep the petals in place.


Illustration #7

To finish the pansy you can sew a yellow or gold bead, or a pearl in the center, as shown above. Or, you can make a French knot using four strands of gold embroidery floss for the center, and a fly stitch (or two bullion stitches) for the pansy's little mustache.
The leaves shown above are acrylic “beads” found at local craft stores.


SILK RIBBON LEAVES:
Illustration #8

Cut a 2” length of 7mm green silk ribbon, and fold in half. Start at the folded end of the ribbon, and run a gathering stitch along the narrow selvage edge.

Illustration #9

Pull the thread and gather the ribbon slightly, and then fasten off with a couple of small stitches.

Illustration #10

Turn right side out and finger press the leaf flat. Gather the stem end of the leaf, fastening the thread securely, and then sew in place. Tack the leaf down using as few stitches as needed to do the job.
I hope you will be making lots of these sweet little pansies to make all of your CQ creations even more beautiful!
Carolyn