Friday, November 27, 2009

CHRISTMAS CRACKERS

CQI Christmas Crackers - 2009
This is the first year I've participated in the annual CQI Christmas Cracker Swap, and I had a wonderful time making the CQ pieced block covers for each cracker, and then gathering a whole bunch of beautiful fabrics and embellishments to roll up inside each one!!!
Finished Cracker #1

CQ Pieced Block Cover for
Cracker #1

Finished Cracker #2

CQ Pieced Block Cover for
Cracker #2

Finished Cracker #3

CQ Pieced Block Cover for
Cracker #3

Tuesday, November 24, 2009

BEADED DRAGONFLY TUTORIAL

All beads are iridescent glass, except
the oval-shaped beads used for the tail.

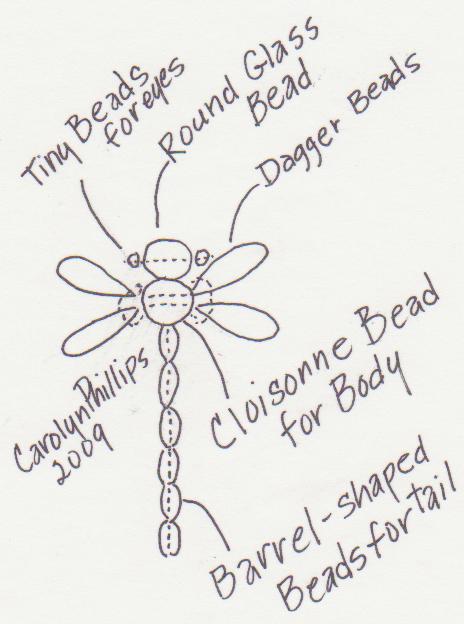
Head: 1 - round 6mm clear glass bead
Body: 1 - round 6mm Cloisonne' bead
Wings: 4 - 13mm dagger beads
Tail: 6 - 5mm oval beads
Beading thread that will blend into background
Beading needle, (or fine #11 or #12 short quilting needle)

Directions and illustration shown below.


The dragonfly is designed to be sewn directly in place onto fabric.

The dragonfly's body is attached first, using the Cloisonne bead, and positioning the bead opening to run horizontally. Attach the body firmly to the fabric using two or three passes through the hole and the fabric. Pass the needle and thread through the body and then thread the needle through the holes in the narrow tip of two of the dagger beads, and then pass the needle back through the Cloisonne bead, exiting on the other side of the body. Thread through the two remaining wings, and then back through the body. Do this a couple of times, being sure that the body and wings are strung together tightly enough to keep them in place, but not so tight that you bread the bead. Refer to the photo and the illustration. If they seem to be a little wobbly, take a couple of stitches up through the fabric where the set of wings attach to the body and down over the thread that holds the two wings together. Repeat for the second set of wings. Do this until each side feels tightly attached.

Attach the clear glass bead for the head. The holes in the bead should run horizontally, and should be sewn in place just as you did the body. Be sure to snug the head tightly against the body while you sew it in place. Pick up one of the tiny glass beads for the eyes, and then run the thread back through the head, and then repeat for the second eye. Take the thread down to the fabric by running the needle down through the space in between one of the eye beads and the head. This helps to hide the thread a little better.

The tail is attached by bringing the thread up snugly against the body, and then through one of the oval beads. Go back down through the fabric and back up at the beginning of the first bead, and then run the thread back through the first bead again. Thread on the second bead, then go back down through the fabric, back to the beginning of the second bead and back through the second bead, and then on through the third bead. Repeat until all six beads are in place.

Hope you enjoy making them!!!


Saturday, November 14, 2009

A Couple More Color Wheels

I've found two more color wheels that I like, mostly because of their simplicity!

Both of these color wheels illustrate Primary, Secondary, and Tertiary colors.
Tertiary (tur-she-airy) means "third," or "third level." More about this when we start our lessons.


Red, Yellow, Blue
Primary, Secondary, Tertiary
Color Wheel


Red, Yellow, Blue
Primary, Secondary, Tertiary
Color Wheel


Please see the main post about supplies -
Color Wheels below.

Thursday, November 12, 2009

OCTOBER'S FREE SILKY

October's Free Silky is the Lavender & Yellow Pansy
Every spring my sweet husband, with a twinkle in his eye and a dopey grin on his face, comes home with "something special" hidden behind his back. As if, after 47 years of marriage, I can't smell the rich soil mingled with the light scent of pansies. My favorites are the ones that refuse to blush at their outrageous deep burgundy, and regal gold finery!
But, it wouldn't be spring without the daintily dressed pink and peach, yellow and lavender, and light blue and periwinkle pansies. Their soft colors might not be as vibrant as their showy cousins, but their appeal can't be denied. Who can resist their soft velvety texture and impish faces? Children say that the places where pansies grow are the most wonderful secret hiding places for tiny fairies and other magical creatures. If your heart is pure, you may see them, too.

Wednesday, November 11, 2009

CQ A to Z Color-Study Lesson

Supplies - Color Wheel

Because a color wheel will be a large part of our color lessons, I’ve been doing a lot of searching in the hopes of finding one that will fit all of our needs. Well……I’ve discovered that none are perfect, but there are some that will work pretty well.

The first is an “Interior Design Color Wheel,” which I like because of its fairly open design (not as much cardboard between you and the colors), and because the colors shown are more appealing and realistic than most. I also like the information that is included on the back side of the wheel, as it gives helpful information about making painting and fabric color choices in your home. And, crazy quilts are certainly something we like to live with!


“Interior Design Color Wheel” 8.5” x 11”
Available from The Color Wheel Company, $9 (which includes shipping in USA.) Contact them for international shipping. (See tiny below.) I think this will be the most useful for our color lesson; however, please do not feel that you HAVE to have it, we can do nicely with the small color wheel available from your local craft store. Also, the printable color wheel at the bottom of the page will work very well for our purposes. http://tinyurl.com/yfzbsoj


The second color wheel is about 5” across, and can be purchased at your local JoAnn Fabrics, Michaels, Hobby Lobby, and most other craft stores. It is a good, compact version of the most popular color wheels, and can be used for our color lessons. (You can always get the Interior Design Color Wheel later.)

This color wheel can be ordered in Spanish, French, and Portuguese from The Color Wheel Co. It is $4.50, which includes shipping in the USA. Contact them for international shipping. http://tinyurl.com/yjfgde6


The following is a great color tool/toy from quilt teacher and author Joen Wolfrom!!

3-in-1 Color Tool by C&T Publishing (optional, but handy)
This is a great tool for those interested in having lots of pretty color choices, along with a little more specific info. The tool is approximately 2.5”x 8”, and includes a set of 24 color cards, a set of two value (lightness or darkness) finders (one red and one green), color schemes are shown on the back of each card, and it comes with an 8” ruler.
Available from http://www.dharmatrading.com/ for $16.45 ($3.90 shipping in USA) Contact them for international shipping. Dharma has 27 of these in stock as of 11/11/09.


PRINTABLE COLOR WHEEL

No matter what color wheel you decide to get, please print this one for our lesson. You can slide it into one of the clear/transparent 3-hole plastic sheet protectors, and it can be kept in a 3-ring binder, if desired.

Okay, the next you hear from me, we’ll be starting our color lessons!!!

Carolyn Phillips
CarolynLPhillips@msn.com


Thursday, November 5, 2009

November's Free Silky - Morning Glory

In June of 1965, on a gloriously warm southern California day, I stood in the back yard of our newly-purchased first home holding my two week old son in my arms while admiring the exceptionally beautiful periwinkle-blue morning glory flowers on the vines that were growing along the short wire fence that divided our property from the elderly Mrs. Thorson's. As a new homeowner, I found everything in our realm nothing short of miraculous, and the little morning glory that I had tended and coaxed along the wire fence was no exception.

Mrs. Thorson, a no-nonsense, hard working New Englander, was an exceptionally tall and lanky woman, all elbows, knees and determination as she worked at pulling weeds on her large property. With a defiant expression on her face, she easily yanked the clumps of weeds from the hard summer soil. There was no doubt that she came from hearty stock as she tirelessly worked her way along the fence. When she finally straightened from her work and wiped the sweat from her brow, her face broke into a wide smile as she saw the baby I held in my arms. As she leaned in to get a closer look, her arm came over the fence, her large hand wrapped fully around the morning glory vine, and with one swift pull, the roots easily lost their hold in the soil and the whole thing traveled through the air to join the other weeds in the steadily growing mound! "I hate those weeds, don't you?" Those were her final words as she strode away......

"Yes," I said, as I closed my gaping mouth, "I do too......"

MORNING GLORY EPILOGUE: Do you remember years ago when Reader's Digest had a long-running section entitled something like: "My Favorite (or my Most Amazing) Character?" Mrs. Thorson was my favorite character.

I still smile over that whole incident; it just tickled me so much that this practical, hard-working, no-nonsense woman thought she was helping a young mother to keep her yard "weed"-free. It would never have occurred to her that she wasn't helping. When my husband came home from work that night, I told him what she had done, and we both had a good laugh! She was eternally "helpful." I knew, even back then, that she was a good woman with a serious veneer. She didn't go around with a smile on her face, but when she did smile, it was like the sun had risen.

She helped me raise my children, and was always coming over to "give me a break." She would head for the kitchen to do my dishes, or go get the vacuum and start cleaning, or sometimes she'd just push me out the door while she stayed and watched the kids.

You can always find another morning glory, but you could never replace Mrs. Thorson.

Carolyn